In This Article
- 1 The Art of Shirt Knotting: An Introduction
- 2 Classic Front Knot: Step-by-Step Guide
- 3 The Side Knot Twist: A Trendy Variation
- 4
- 5 Back Knot Magic: Creating a Backless Illusion
- 6 Double Knot Chic: A Dual Twist on Style
- 7 Cropped Look with a High Knot
- 8
- 9 Knotting Techniques for Different Shirt Types
- 10 Shirt Knotting Dos and Don’ts
The Art of Shirt Knotting: An Introduction
Knotting a shirt can transform a simple outfit into a statement piece. This technique isn’t just about tying a piece of clothing. It’s about adding personality and flair to your wardrobe. The trend of shirt knotting is gaining momentum in 2025, and it’s time to get on board. Whether you’re aiming for a relaxed weekend look or an edgy twist on office wear, understanding how to tie a knot in a shirt is essential. It provides versatility to your style without the need to invest in a new wardrobe.

Learning the basics of shirt knotting opens up a plethora of styling options. A well-placed knot can cinch your waist, give a fresh look to an oversized shirt, or simply add a funky detail to an otherwise ordinary outfit. In this guide, we’ll explore several timeless and contemporary techniques that cater to a variety of aesthetics and shirt types. So grab your favorite button-down, T-shirt, or blouse, and let’s dive into the stylish world of shirt knotting. Keep in mind, while creativity is welcome, knowing a few essential tips will keep your look polished and chic.
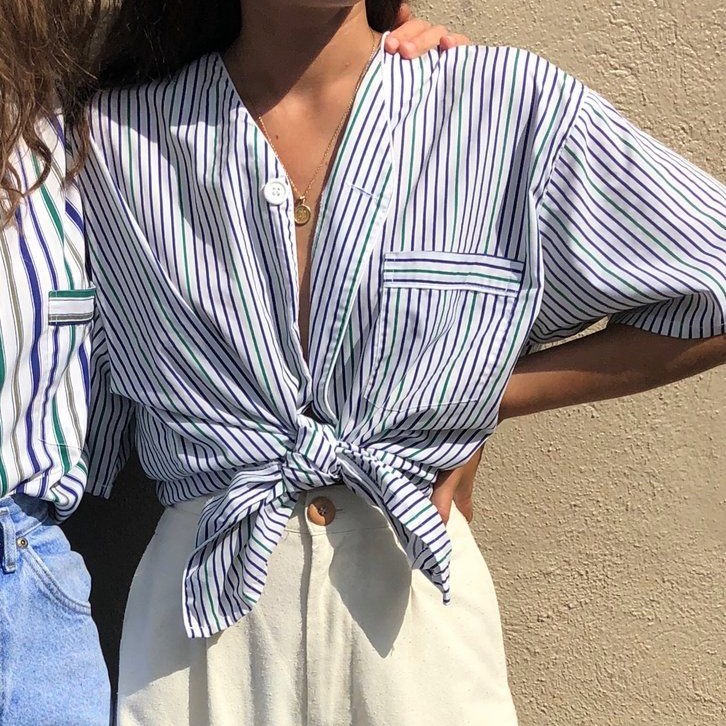
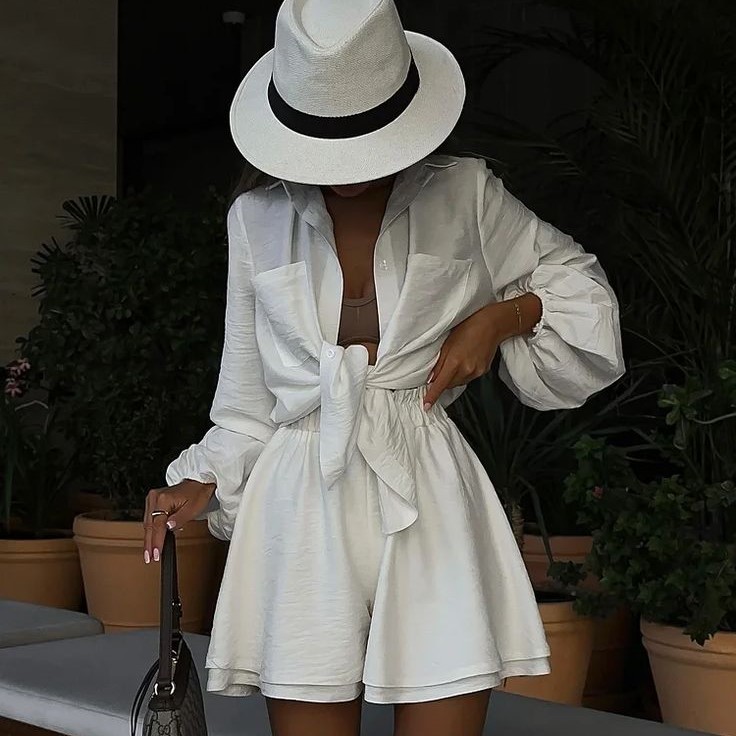
Classic Front Knot: Step-by-Step Guide
The classic front knot is a timeless technique that can add a casual yet chic twist to your look. Here is a simple guide on how to tie a knot in a shirt, front and center, perfect for any casual occasion.
- Choose the Right Shirt: Any button-down or loose T-shirt works best for this style. Ensure the shirt is long enough to tie without feeling too tight.
- Unbutton the Lower Buttons: If it’s a button-down shirt, unbutton the last three to four buttons. This will give you enough fabric to work with.
- Pull the Shirt Tails: Grab both ends of the shirt at the hem and pull them gently in front of you. Make sure they are even.
- Form the Knot: Cross the right end over the left, then pull it under and through the loop, similar to the first step of tying shoelaces.
- Tighten the Knot: Adjust the knot by pulling each end, making sure it sits just above your waistline. The knot should feel snug but comfortable.
- Final Adjustments: Smooth out any bulges or puckers around the knot. Tuck in the tips of the shirt tails for a neat appearance, or let them drape for a more relaxed vibe.
This classic front knot technique is versatile and can be applied to different shirt types to suit your style, whether you’re dressing up for a day out or styling for a laid-back evening.
The Side Knot Twist: A Trendy Variation
Encounter the side knot twist: a trendy, asymmetrical take on shirt knotting. This variant brings an instant update to any casual look. It’s playful yet stylish and works particularly well with soft, flowy fabrics. Let’s walk through the steps to achieve this look.
Select a Suitable Shirt
- Choosing the Right Type: Begin by selecting a shirt that is suitable for knotting. Opt for T-shirts, tank tops, or lightweight button-down shirts, as these styles typically work best for creating a knotted look.
- Extra Fabric Requirement: Ensure the shirt has extra fabric on the sides. This additional length allows for effective knotting without leaving the shirt looking short or misshapen.
- Fabric Consideration: Keep in mind that softer, more flexible fabrics tend to be easier to knot and manage. Rigid materials may not hold knots as well and can lead to discomfort.

Position the Shirt
- Wearing the Shirt: Put the shirt on and assess how it fits your body. Make sure it’s comfortable and that you can easily access both sides of the shirt.
- Choosing the Knot Side: Decide which side you want to knot. This can be on your left or right side, depending on your personal preference or how you want to style the shirt. Visualize how this will complement the rest of your outfit.
- Finding the Right Spot: Look at the fabric around your waistline and determine where you want the knot to sit, making adjustments as needed before gathering the fabric.
Gather the Fabric
- Pinching the Fabric: Pinch a section of the shirt on the side you’ve chosen. Grab enough fabric to create a secure knot, which will ensure that the knot holds throughout your activities.
- Pulling Away from Your Body: As you pinch the fabric, pull it slightly away from your body. This action helps create the volume you need to form a knot while allowing you to see how the shirt will shape as you twist it.
Twist and Knot
- Twisting the Gathered Fabric: With the fabric pinched, twist it once or twice. This twisting action helps to form the knot and secures the gathered fabric in place.
- Creating the Knot: Once twisted, loop the gathered fabric through itself to create a simple knot. Ensure that the fabric is tight enough to hold, but not so tight that it strains the fabric or makes it uncomfortable.
- Knot Type: You can also experiment with different knot styles (like a double knot) if you prefer more security or a more decorative finish.
Adjust the Fit
- Tightening the Knot: After creating the knot, pull on the fabric gently to tighten it. The knot should sit snugly at your waist or hip area, enhancing the shirt’s silhouette.
- Consider Shirt Length: Depending on the shirt’s length and your desired look (whether you want it to be more fitted or relaxed), adjust the position of the knot accordingly for the best visual effect.
- Aesthetic Appeal: Take a step back and look at your reflection to ensure the knot looks intentional and stylish.
Ensure Comfort
- Test for Comfort: Move around gently to ensure that the knot remains secure and doesn’t loosen with movement. Make sure that the fabric does not dig into your skin and remains comfortable throughout your wear.
- Check for Style Consistency: As you move, check that the knot complements your overall outfit and doesn’t distort the shape of the shirt.
- Confidence in Your Look: Finally, if everything feels good and looks right, enjoy your stylish new look with confidence!
The side knot twist is ideal for adding shape to an oversized top or for casually elevating a simple jeans-and-T-shirt combo. Experiment with the placement and tightness of the knot to find the most flattering look for your body type. This technique is a must-try for those wanting an easy yet effective way to refresh their wardrobe in 2025.

Back Knot Magic: Creating a Backless Illusion
Transform your classic top into an eye-catching backless outfit with the back knot magic technique. Ideal for button-down shirts or loose-fitting blouses, this method is perfect for adding a touch of glamour to your ensemble. Here’s how to create this illusion:
- Opt for the Right Shirt: A shirt with a straight or slightly loose fit works best.
- Prepare the Shirt: Put the shirt on backwards, so the buttons are at the back. Leave the last few buttons undone.
- Tie the Knot: Pull the two lower ends of the shirt to create tension and tie them into a secure knot just above your waist.
- Adjust for Comfort: Ensure the knot is not too tight. It should allow freedom of movement but still maintain the backless effect.
- Check the Front: The neckline should sit comfortably. Adjust if needed to avoid any awkward gaps or bunching.
- Finishing Touches: For a sleek silhouette, ensure the remaining fabric flows smoothly down your back.
The back knot technique gives life to older shirts by crafting a daring new look without spending extra. It’s a bold statement for summer parties or evening events. Try pairing it with high-waisted pants or skirts to complete the chic backless style. Remember to practice how to tie a knot in a shirt in front of a mirror for the best results. Dive in and let this back knot enchantment take your fashion game up a notch in 2025.
Double Knot Chic: A Dual Twist on Style
For those who love to push fashion boundaries, the double knot chic technique is your ally. This innovative style incorporates two knots, adding a unique touch to your shirt ensemble. Whether you’re looking to draw attention at a social gathering or just want to spice up your day-to-day attire, this dual twist on style is the perfect fashion statement.
- Select Your Shirt: Aim for a longer shirt or a tunic—ample fabric is key here.
- Begin with One Knot: Follow the classic front knot method, but leave it slightly loose.
- Create the Second Knot: Take the tails from the first knot and tie another knot below it.
- Adjust the Knots: Work both knots until you achieve balance and the desired tightness.
- Check Proportions: Ensure the knots do not overpower your look by keeping them in proportion to your frame.
- Flaunt with Confidence: Embrace this layered knotting technique and wear it with poise.
The double knot chic is a fashion-forward choice that adds dimension to your look. It’s a bold twist that can transform a mundane shirt into a layered masterpiece. When mastering how to tie a knot in a shirt, experimenting with the double knot technique can lead to new levels of style sophistication in 2025.
Cropped Look with a High Knot
Achieve a cropped shirt effect using a high knot technique. This style is perfect for hot days or for a fun twist to your outfit. Here’s a simple process to get this trendy look:
- Pick the Right Shirt: A longer tee or blouse is ideal for a high knot.
- Locate the Knot Area: Decide where you want the cropped effect—usually under the bust.
- Gather the Fabric: Pull the material upwards from the hem and hold it at the chosen spot.
- Tie the Knot: Twist the fabric and tie a knot, securing it above your chosen area.
- Adjust for Crop Length: Make sure the knot’s height gives the cropped look you desire.
- Smooth Out the Shirt: Fix any bunching above the knot for a flat, polished appearance.
A high knot can turn a simple shirt into trendy crop-top style without cutting the fabric. Pair it with high-waisted pants or skirts to nail the look. Use these steps on how to tie a knot in a shirt for a quick wardrobe update.
Knotting Techniques for Different Shirt Types
Knotting isn’t one-size-fits-all; different shirts require unique approaches. Let’s explore how to tie a knot in a shirt, catering to various types.
- Button-Down Shirts: These classic garments offer a formal vibe when knotted at the waist. Ensure it’s loose enough to knot without straining the fabric.
- T-Shirts: Go casual with a knot on the side or front of your tee. Pick a spot that flatters your shape.
- Blouses: Delicate fabrics work well with a high knot for a chic, cropped look. Be gentle to avoid damaging the material.
- Tunics: For a more bohemian style, try a low knot at the hip to accentuate the flow of fabric.
- Oversized Shirts: Knot these at the back to create a stylish, fitted illusion. It drastically alters the shirt’s silhouette.
- Crop Tops: Already short, crop tops can be subtly twisted at the bottom to add texture to your outfit.
- Dress Shirts: Transform your office wear by knotting just above the waistline, perfect for after-work events.
Remember, the key when knotting is not to over-tighten; aim for comfort and ease of movement. Whether you are dressing for a casual day out or an evening soiree, mastering these techniques for different shirt types will ensure you are always in style. Keep experimenting to find the knotted look that best suits your personal style and the occasion.
Shirt Knotting Dos and Don’ts
When tying knots in your shirts, following some basic dos and don’ts will ensure your knotted styles look fantastic while preserving the integrity of your garments. Here’s a straightforward guide to help you nail the technique.
Dos
- Use the Right Fabric: Opt for shirts made of softer, more pliable fabrics.
- Consider Shirt Length: Ensure your shirt is long enough for the intended knot without restricting movement.
- Practice Tying Knots: Familiarize yourself with various knots to find what works best for your outfit.
- Check the Mirror: Look at yourself from all angles to make sure your knot is flattering.
- Keep It Comfortable: Tie knots that allow you to move freely and don’t dig into your skin.
Don’ts
- Avoid Delicate Fabrics: Be cautious with silks or fine knits to prevent damage while knotting.
- Don’t Pull Too Tight: Over-tightening can deform your shirt and cause discomfort.
- Forget the Proportions: Don’t let knots overpower your frame or take away from the outfit.
- Skip on Maintenance: Loosen knots before washing to avoid permanent creases.
- Neglect Your Look: Double-check your outfit so it looks intentional, not haphazard.
By adhering to these tips, you’ll know how to tie a knot in a shirt with confidence and style. Shirt knotting is an art form that can elevate your fashion game if done correctly. Enjoy experimenting with different techniques and remember to always knot with care!