In This Article
- 1 Trendy Transformation: Basic T-Shirt Makeover Tips
- 2 V-Neck Magic: Creating Illusion Necklines
- 3 Stylish Cutout Neckline Tee Designs
- 4 One Shoulder Chic: Elegant T-Shirt Redesign
- 5 Creative Cross Cutout Tee Shirts
- 6 Geometric Wonders: Adding Shapes to Your Shirt
- 7 Angelic Wings: Crafting Cutout Backs
- 8 Choker Collars: Punk-Inspired Cuts
- 9 Customization Galore: Multiple Cutting Ideas
- 10 Bow Back T-Shirts: A Touch of Elegance
- 11 Workout Ready: Cutting Muscle Tees & Tank Tops
- 12 From Casual to Beachy: DIY Dress Coverups
- 13 Off the Shoulder Tops: Summer Fashion Hacks
- 14 Crop Top Creations: Turning Shirts into Trendy Pieces
- 15 Sleeve Shredding Techniques for a Unique Look
Trendy Transformation: Basic T-Shirt Makeover Tips
How to diy t-shirt cutting ideas step by step? Transforming a basic t-shirt into a trendy piece can be simple and fun. With diy t-shirt cutting ideas step by step, you can turn an old top into a fashionable garment. These tips can help you give your wardrobe a fresh look.

- Plan Your Design: Before cutting, visualize the end result. Decide on the style you’re aiming for. Whether it’s a v-neck, cutout, or cropped design, planning helps avoid mistakes.
- Select the Right Tools: Sharp scissors are a must. Choose fabric scissors for clean cuts and a seam ripper for removing stitches effortlessly.
- Mark Before You Cut: Use chalk or a fabric marker to outline your cuts. This ensures symmetry and precision.
- Experiment with Edges: Instead of standard straight cuts, try scalloped or zig-zag edges for added flair.
- Consider Fabric Stretch: Remember, cutting can alter how a shirt fits. Stretchy materials may need more cautious cutting.
- Go Slow: Take your time with each cut. Rushing can lead to errors that are hard to fix.
- Hemming for Longevity: If you can, hem the edges. This keeps the fabric from fraying and extends the life of your redesigned t-shirt.
- Try Layering: Some cuts work well when layered over tank tops or bandeaus. Experiment with colors and textures underneath.
- Stay Trendy: Keep an eye on the latest fashion trends. Incorporate current styles into your t-shirt transformation for an up-to-date look.
By following these basic makeover tips, you can confidently revamp your old t-shirts. Enjoy the process and show off your unique, trendy creations.
V-Neck Magic: Creating Illusion Necklines
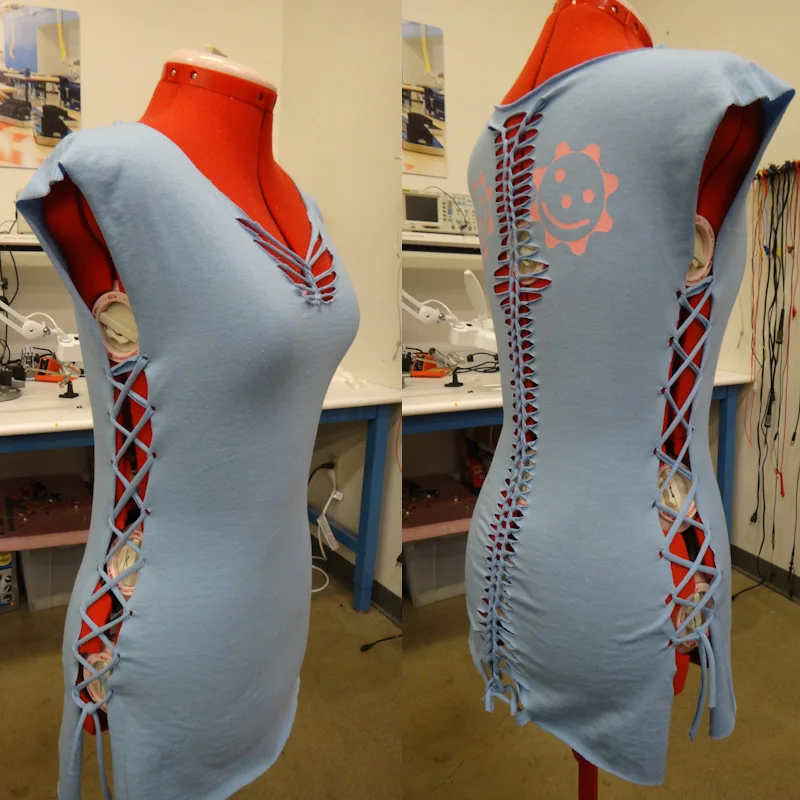
Creating illusion necklines on t-shirts adds a touch of sophistication to an otherwise simple garment. Get started with diy t-shirt cutting ideas step by step to craft your V-neck masterpiece. Here’s how to bring this v-neck magic to life with ease:
- Outline Your V-Neck: Begin by drawing the neckline shape. Use chalk or fabric marker for guiding lines.
- Precise Cuts: Take sharp scissors to slice along the outline. Make each cut exact for a clean finish.
- Progressive Gaps: Begin with a wider gap at the top. Gradually narrow the cuts to mimic a corset look.
- Secure the Edges: For non-fray fabric, leave edges raw. If not, consider a light hem.
- Experiment with Width: A wider V-neck offers boldness, while a narrow V gives subtlety.
- Try Layering: Wear a contrasting color tank underneath. This highlights the neckline even more.
With these steps, taking an old t-shirt from dull to dazzling is a breeze. Remember, each cut transforms the simple into stylish. Practice on an older shirt before your favorite tee to perfect your technique. Enjoy creating a personalized V-neck that captures your style perfectly.
Stylish Cutout Neckline Tee Designs
Cutting the neckline of a t-shirt can instantly add style and character. Explore these diy t-shirt cutting ideas step by step for striking cutout neckline designs. Transform a simple tee into a statement piece with these easy-to-follow tips:
- Triangle Cutouts: Create a playful effect by cutting small triangles along the neckline. Alternate the direction of each triangle for a dynamic look.
- Precision is Key: Use sharp scissors and cut carefully. This ensures clean lines and a professional finish.
- Interchangeable Styles: Switch between a bold statement or a subtle accent by adjusting the size of your cutouts.
- No-Sew Options: Choose designs that do not require sewing for quick updates. Raw cutouts can be just as fashionable.
- Secure the Fabric: If you’re cutting near the edge, make sure the fabric won’t unravel. Use a light touch to prevent over-cutting.
- Customize Further: Add beads or tie knots along the edges for an extra flair. This adds a personal touch.
By using these diy t-shirt cutting ideas step by step, you can make a stylish cutout neckline tee that showcases your creativity. Each design becomes a wearable piece of art that revamps your wardrobe without a hefty price tag.
One Shoulder Chic: Elegant T-Shirt Redesign
Giving a t-shirt a one-shoulder cut can create an elegant and sophisticated look. Follow these diy t-shirt cutting ideas step by step for a chic redesign. Here’s how to create a stunning one-shoulder top:
- Map Out Your Cut: Decide which shoulder you want to expose. Draw a diagonal line from the collar to underarm on the opposite side.
- Make the Cut: Use sharp scissors to cut along the line. Do this carefully to avoid jagged edges.
- Hem or Leave Raw: Depending on the fabric, either hem the edge or leave it raw for an edgy style.
- Adjust for Comfort: Ensure the remaining shoulder strap is wide enough. It should not slip off during wear.
- Add Straps if Desired: For a creative twist, add ribbon or fabric straps. They can enhance the design and provide extra support.
By taking these steps, you can transform an old t-shirt into a chic one-shoulder top. It’s a simple update that makes a significant impact on your style. Remember to go slow and steady for the best results. Enjoy wearing your newly redesigned t-shirt with pride!
Creative Cross Cutout Tee Shirts
Add a modern twist to your t-shirts with creative cross cutout designs. Here’s how you can craft this unique look with ease:
- Sketch the Cross Design: Choose where to place your cross. Use chalk to draw it on the back of the shirt.
- Cut with Precision: Following the lines, cut out the cross shape with fabric scissors. Smooth edges make a neater look.
- Variety of Shapes: Instead of a cross, try hearts or abstract patterns for diversity.
- Play with Sizes: Large cutouts make bold statements while smaller ones add subtle detail.
- Secure Loose Ends: If the design is near seams, reinforce them to avoid tearing.
- Layer Creatively: Wear a contrasting tank underneath to make the cutout pop.
Remember, diy t-shirt cutting ideas step by step should always be done with sharp tools for clean cuts. As you follow these guidelines, you create a stunning, individualized t-shirt. It’s a simple, fun way to inject personality into your wardrobe.
Geometric Wonders: Adding Shapes to Your Shirt
Enhance your t-shirt with geometric shapes for a fresh, modern style. These diy t-shirt cutting ideas step by step are perfect for a creative makeover. Let’s dive into crafting this geometric wonder:
- Decide on a Shape: Choose a shape like a diamond, triangle, or any abstract form. Simple shapes often create the most striking designs.
- Mark Your Design: Use chalk to trace your shape onto the t-shirt. This helps with precise cutting.
- Careful Cutting: Slice through the fabric along your markings. Keep each cut smooth and even.
- Start Small: Begin with a smaller shape. You can always expand it later.
- Consider Position: Place shapes on the chest, back, or hem. Think about how the shape changes the shirt’s look.
- Mix and Match: Combine different shapes for a unique pattern. Layering shapes can add depth to your design.
By following these steps, you can turn a simple t-shirt into a geometrically inspired piece. It’s an easy and fun way to personalize your clothing. Remember to work slowly and steadily for the best outcome. Show off your new geometrically cut t-shirt with pride!

Angelic Wings: Crafting Cutout Backs
Add a heavenly touch to your t-shirts with angelic wing cutouts. Here’s a simple guide to creating your own.
- Choose Your Wing Pattern: Find a wing pattern that suits your style. You can create your own or download one online.
- Trace the Design: Place the pattern on the back of the shirt. Use chalk to trace it.
- Prep Your Shirt: Lay your t-shirt flat on a cutting surface. Ensure it’s smooth.
- Cut Out Wings: Follow the chalk outline to cut out the wings. Use sharp scissors for precision.
- Mirroring Matters: Cut one wing, then flip the pattern to cut the other for symmetry.
- Seal the Edges: If needed, use a fray check solution to seal the fabric edges.
- Accessorize: Add glitter or fabric paint to make your wings sparkle.
Wear your new winged t-shirt and feel fabulous. Enjoy crafting!
Choker Collars: Punk-Inspired Cuts
Add an edgy punk twist to your wardrobe with DIY choker collars. These bold transformations are easy to craft. Here’s how to bring this punk-inspired cut into your t-shirt designs:
- Draw a Choker Outline: Use a fabric marker to draw a choker on your t-shirt. It should sit comfortably around your neck.
- Cut Carefully: Cut along the outline with sharp scissors. Smooth cutting is essential.
- Adjust Width: Choose the width of your choker. A wider strip stands out more.
- Neckline Choices: You can pair the choker with a deep V-neck or scoop neck. This enhances the punk vibe.
- Secure Edges: If needed, lightly hem the edges to prevent fraying.
- Add Decorations: Personalize with studs or spikes for extra flair. These capture the punk essence.
With these steps, create your own choker collar t-shirt. It’s a stylish and daring addition to any outfit.
Customization Galore: Multiple Cutting Ideas
Unleash your creativity with a medley of cutting ideas for t-shirts. Each pattern you choose adds a personalized touch to your wardrobe. From intricate designs to simple cuts, the possibilities are vast. Here’s how to get inventive:
- Fringe Fun: Slice the bottom hem into fringes for a playful look. Knot the fringes for a textured effect.
- Butterfly Patterns: Use a stencil to cut a butterfly shape on the back. It’s both whimsical and stylish.
- Kimono Transformation: Convert a tee into an open, kimono-style cover. Add fringes for a bohemian vibe.
- Fringed Cap Sleeves: Give your t-shirt fringed sleeves. Add a tie at the bottom for shape.
- Fabric Flowers: Snip fabric into floral designs and attach them to your shirt. This adds a 3D element to your style.
- Rubber-Bound Hem: Elevate a high hem with a thin, decorative rubber. It creates a cinched look.
By exploring these diy t-shirt cutting ideas step by step, you can transform your t-shirts into custom pieces. Remember, each snip is a chance to express yourself. So grab your scissors and let your imagination lead the way!
Bow Back T-Shirts: A Touch of Elegance
Bow back t-shirts combine elegance and creativity in a simple design makeover. Transform a plain t-shirt into a chic fashion item with a few cuts and minor sewing. Here’s how to add this touch of elegance to your wardrobe:
- Select the Right T-Shirt: Choose one that fits well but has a simple back.
- Draw the Bow Outline: Use a fabric marker to sketch the bow shape on the back of the shirt. This helps guide your cuts.
- Cut Out the Bow Shape: Carefully cut along the drawn lines with sharp fabric scissors. Ensure the cuts are as clean as possible.
- Hem the Edges: Lightly hem the edges around the bow cut-out to prevent fraying. This step requires some sewing.
- Create Fabric Straps: Cut additional fabric strips to make the ties of the bow. Attach these at either side of the bow.
- Secure Everything: Sew the straps to the main cut-out to hold the design firmly.
- Adjust the Fit: Try on the shirt and adjust the bow for the best visual impact.
This transformation not only revitalizes an old t-shirt but also adds a unique style element. The bow at the back provides a surprising and elegant detail that can complement various outfits. Enjoy wearing your new bow back t-shirt with pride and confidence!
Workout Ready: Cutting Muscle Tees & Tank Tops
Turning your old t-shirts into muscle tees and tank tops is perfect for workouts. Here’s how to do it:
- Plan Your Cut: Decide how wide and deep you want the armholes. This affects the fit.
- Mark Armholes: Use chalk to outline the new armholes on your t-shirt. This guides your cutting.
- Cut Carefully: Follow the lines and cut slowly for smooth edges. Always cut away from your body.
- Try on for Size: Put on the tee to check the fit. Make small adjustments if needed.
- Finish Edges: Decide if you want to hem or leave the edges raw. Both styles work.
- Get Creative: Add side knots or racerback twists for extra flair.
With these easy steps, you’ll have new gym-ready attire that’s stylish and comfortable. Plus, you’ll feel great giving your old t-shirts a new purpose!
From Casual to Beachy: DIY Dress Coverups
Turning a t-shirt into a beach dress coverup is a stylish and practical DIY project. Here are some simple steps to create your own:
- Choose a Longer T-Shirt: Pick a t-shirt that reaches mid-thigh or longer for appropriate coverage.
- Mark Your Cuts: Decide where you want the armholes and neckline to be. Draw them on the shirt.
- Cut Out Neck and Arms: Use scissors to cut the marked areas. Be precise with your cuts.
- Create a Waist: Cut or tie the shirt to define the waist. This adds shape to the coverup.
- Add Details: Customize with fringes or a fabric bow. These elements give a playful look.
- Test and Adjust: Try on the coverup. Make any needed adjustments to fit or style.
With these steps, your casual tee turns into a beach-ready coverup. It’s perfect for summer days by the water. Enjoy crafting and wearing your new DIY piece!
Off the Shoulder Tops: Summer Fashion Hacks
Transform your t-shirt into a breezy off-the-shoulder top. Perfect for summer, this style is both cool and chic. Here are some quick diy t-shirt cutting ideas step by step for this summer hack:
- Sketch Your Cut Line: Draw a horizontal line across the shirt, just below the collar. This line marks where you’ll cut.
- Trim the Neckline: Carefully cut along the sketched line. This creates the off-the-shoulder neckline.
- Adjust the Sleeves: For a fluttery effect, trim the sleeves diagonally. Start from the shoulder and angle down.
- Elastic Is Key: For a snug fit, sew a thin elastic inside the new neckline. This helps prevent slipping.
- Check Your Work: Try on your newly cut top. Make any necessary tweaks for a more comfortable fit.
- Final Touches: Add buttons, lace, or other decor for a personalized look.
Creating off-the-shoulder tops is simple and stylish. With minimal effort, you can enjoy a fresh, summer-ready look. Just grab your scissors, follow these steps, and you’re all set!
Crop Top Creations: Turning Shirts into Trendy Pieces
Turning your old shirts into trendy crop tops is a fun DIY project. Here’s how you can create stylish pieces with simple cuts. Follow these diy t-shirt cutting ideas step by step to transform any ordinary top into a chic crop top.
- Measure First: Decide how short you want your crop top. Use a tape measure for accuracy.
- Mark the Cut Line: Draw a horizontal line where you’ll cut. Use a fabric chalk for visibility.
- Ensure Even Cutting: Use sharp scissors to cut across the line. Keep your hand steady.
- Try Zigzag or Scalloped Edges: For extra flair, cut edges in zigzag or scalloped patterns.
- Optional Hem: Hem the bottom for a cleaner look. This prevents fraying.
- Add Personal Touches: Attach fabric patches or paint designs to personalize your crop top.
These steps help you create your own unique crop tops. Use them to add stylish, affordable updates to your wardrobe. Have fun mixing colors and patterns!
Sleeve Shredding Techniques for a Unique Look
Sleeve shredding is a bold twist you can add to your t-shirts. Here’s a step-by-step guide:
- Measure and Mark: Decide the length and style of your shreds. Use chalk to mark them.
- Cut with Care: Slice from the hem up to your marks. Keep cuts even for a neat look.
- Pull and Stretch: Gently tug on the strips to curl the edges. This adds texture.
- Arrange Strips: Lay them flat or twist for varied effects.
- Secure the Sleeve: If the shreds reach high, ensure the sleeve stays put. You may sew a thin line at the top.
- Adjust as Needed: Try it on. If it’s too tight or loose, make changes.
Sleeve shredding offers a unique, textured style to your tees. It’s a simple, exciting way to express your creative side. Enjoy crafting a cool, shredded-sleeve look!


